New Arrival: Aika Granzchesta

My longtime quest to obtain all the 1/6 scale ARIA figures is one step closer to completion! A packaged arrived the other day containing one Aika Granzchesta figure from Solidworks. Unfortunately, there aren’t very many ARIA figures out there and even fewer full figure series featuring all of the characters. Ever since I picked up Akari at Animazement ‘07, I quested for the remaining 5 girls.

IMG_3029Aika still in the box

As with the other figures in the series, Aika comes with an oar, nice display stand (she’s attached to it using screws), and a rendition of her company’s mascot (in this case, President Hime). This particular figure is unique in that she comes with two heads, each with a different hairstyle and expression. The default head is her original look at the start of the series. The alternate head is modeled after her accident during a barbeque and subsequent change in look. Personally, I prefer the original style better, however I had grown to like the later style when she is in civilian clothing.

IMG_3040 Aika’s “new look”

Overall, quality of the figure is good with very few noticeable seams or defects. I’m also a big fan of the way the uniform’s wrinkles are colored to give the impression of shadows even in low light. The only flaw I’ve noticed is with the way she was packaged. Since she came with the original head on, the ends of her pigtails were pressed into her back. Since she has blue hair, the friction had caused some of the paint to transfer to the white uniform. This could have easily been remedied by a thin piece of plastic wrapping stuck to the back of the figure prior to packaging.

IMG_3035 
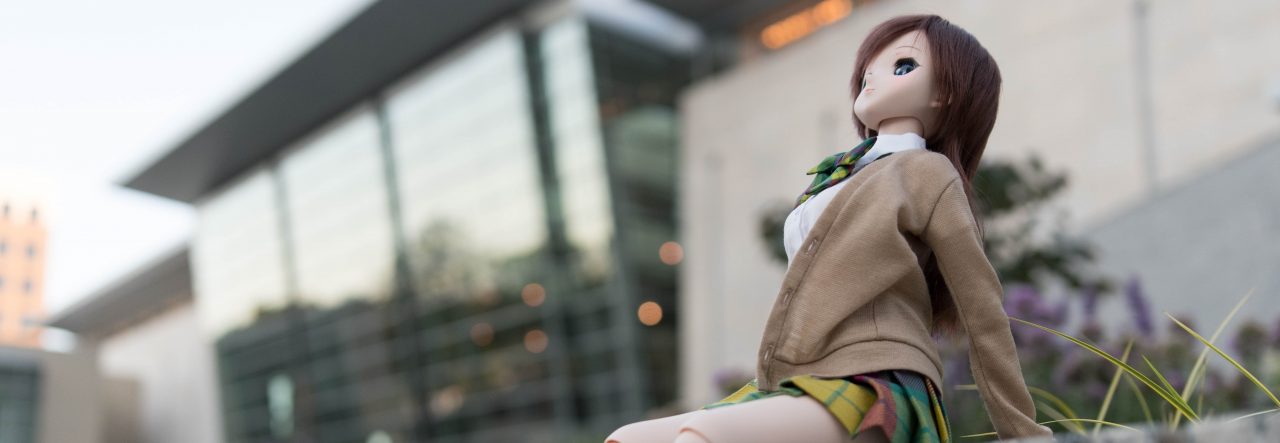
Aika posing in front of a backdrop from ARIA artbook “Stella”

Volks announces availability of limited items from Dolls Party 21

Ever since I saw the announcement on DannyChoo about the upcoming Tohsaka Rin Dolfie Dream, I decided I really wanted one. At $528, she almost seems like a bargain, considering how much Dolfies run for (usually in the $1k range). It looks like I may have a chance, if I actually decide to jump, as Volks USA will be putting the limited items up for sale from May 5-8 (see their blog for more info).

yhst-70052297082953_2051_17161230

Just look at that face! I think it’s one of the better Dolfie renditions I’ve seen. As nice as the Saber one was, I didn’t really care much for the hair or face. Someone talk me out of trying to buy one… please!

Fixing Konata

Since I broke Konata’s leg last night in preparation for a photo shoot, I decided to seek out a replacement. Thanks to my friends over at DannyChoo, I soon found a US seller that still had stock of the now hard to find figure. For not too much money (and a bit less than what I paid for the first one), I will be receiving a new Konata Figma from AnimePavilion. Though I couldn’t help myself and also ordered a Tohsaka Rin Figma… I keep telling myself it was only $1 more to ship two Figma instead of one, so it’s really worth it. Somehow, I don’t think it quite works that way.

With the new Konata on the way, I set my sights to fixing the one I already had. I felt bad at breaking it after just one attempt at posing her, so I broke out the glue and got to work. First, I worked the remaining leg from the socket and was left with the two pieces on the table. Since the break was fairly clean, it was easy lining up the pieces. A small dab of superglue did the trick with holding them together, and after setting for a few minutes, I reattached the entire leg. Fortunately, the break happened when it was still fairly straight, so the pose isn’t too unnatural for display.

IMG_3025 Konata and her new best friend. No cast necessary!

IMG_3024

IMG_3023

Close up of the joint. Can you tell it was broken?

New figure – Lena Sayers

I broke down last week and found myself a low priced auction for the 1/10 scale Lena Sayers figure from Wave. Initially, when I saw the announcements for the figures, I was pretty excited about the release. However, seeing the small scale made me weary to pick it up. Now that I have her in hand, I’m glad I made the jump! Of all the characters from Mai-Otome S.Ifr, she’s probably my favorite. Just look at that innocent smile!

IMG_1907

Adding lighting to the new shelves

I hit IKEA again over the weekend (second week in a row!) to pick up some other items that I left last time. While browsing, I stumbled upon a couple of LED light sets from the LACK series. They looked pretty interesting, so I jotted down the name and went to look at them later. The lights came in a couple of variants, a stick-on spot lamps, hanging pendants, and angle adjustable spots (presumably for a book shelf). Since they looked interesting, I went ahead and picked up one set of the stick-on spots and one of the hanging pendants.

Getting them home, I set to work to putting them up. First for the pendants. They were actually fairly difficult to put up, since I had to measure from the ceiling and approximate the distance based on where my shelf was. Once they were hung, there was the problem with the wires. I got creative with some thumb tacks and managed to secure the wires in a way that didn’t look absolutely terrible… Once lit, I knew my efforts were worthwhile!

IMG_1884IMG_1885IMG_1886

IMG_1867The fully lit shelf (all other lights are off)

Then it was on to the DETOLF cases I’d bought. Since I only had one set of stick on lights, I could only do one case for now. It was somewhat difficult trying to figure out the best placement, and I ended up putting them in the front corners. That way, the front of the display was flooded with light and maximum illumination was achieved. The real problem, however, became figure placement. Keeping the larger figures on top meant they would reduce the amount of light filtering down. I ended up with some rearranging to achieve better results.

IMG_1876 IMG_1879

The wires for both lamps were threaded through the opening in the top then bundled up. The control switch is attached near the front of the case to allow for easy access. Finally, the power wire was run down the corner of the case and secured with transparent tape. Fortunately, the wires are semi-transparent and easy to hide against the glass. I may eventually do something with the power sources and link them together with one master switch.

IMG_1872IMG_1873

The final results look nothing short of stunning. Now that this experiment is a success, I’ll need to go back and get another set for the other case.

New figure display cases

Yesterday, I visited an IKEA for the first time. After seeing a couple of recommendations, I decided to scope out some new display cases to use for the various figures in my collection. I spied the much praised Detolf cases and decided I had to bring two of the home. After much labor in putting them together and getting them cleaned up, I’m happy to present the results.

IMG_1847

I’d also picked up a wall shelf for the purpose of displaying Figma. I got that mounted today and loaded up. That looks pretty good as well.

IMG_1824

In all, that was $150 well spent. I’ll primarily be using the display case for the larger scale quality figures. I may also eventually add some lighting, though all of the stuff I’d seen at IKEA was halogen based, which gets too warm for my taste. The extra shelf space has also given me some extra room on my main shelf to display the smaller figures and space things out.

IMG_1858The overall display area

IMG_1853My desk area

IMG_1854Bonus shot of the swimsuit beauties

IMG_1857All of those figure boxes have to go somewhere…. cardboard boxes are full of figure boxes as well

Gift of Saber

When I pulled into the driveway today, I noticed a box sitting on my front porch. Upon closer examination, the box was from HLJ, meaning my new Saber figure was finally here! As a newcomer to the figure arena, Gift has a lot of stiff competition from companies like GSC, Max Factory, and Kotobukiya. Fortunately, it appears that they are up to the challenge, delivering one of the most detailed Saber figures to date.

This has only been my second order from HLJ, with the majority of my online orders being filled by Play Asia. The packaging was designed to make her trip from Japan a comfortable one.

IMG_1701Saber sits comfortably in her box

It actually took quite a bit of effort to get the product package out of the box. It turns out the box was shrink wrapped to a piece of cardboard prior to going in. This made for a tight fit and ensured the inner packaging didn’t rattle around during transport.

IMG_1702 The cat inspects the packaging solution

I took a break for dinner, but it seems that Figma Saber decided not to wait for me to open the box up…

IMG_1704Does my face really look like that? IMG_1706 Helloooo in there…
IMG_1708Let’s do this! IMG_1711 This should be good enough…

The strangest thing struck me about the inside packaging. The twist tie holding Saber to the plastic shell actually went all the way through both pieces. I actually had to remove it before the clamshell would open. I’ve never seen that before in any of the figures I own! The other thing that struck me as interesting was the display base. It’s actually a mirrored surface, which allows for light to reflect up and give the semitransparent dress some illumination. Another nice touch from Gift. I’ve never felt inclined to polish a display base, so this is another first.

IMG_1716I can read DannyChoo.com through it!

IMG_1719 Saber out of the box. Aint she purty?


IMG_1721The two Sabers side by side

Enough random pictures for now, time to talk about the figure itself. Gift took a couple of artistic licenses when designing the figure. For the most part, the results came out really well. The detail on the armor is stunning, as is the flowing dress underneath. She even got an enlarged gauntlet on her left arm (presumably for defense purposes). The engraving on the sword is a bit strange though, looking more like a series of scribbles instead of actual writing. I was always under the impression that Excalibur said something there, but perhaps I was mistaken.

Now I get to perhaps the most controversial part of this figure: the heads. Gift decided to do two different heads for Saber, an “Anime style” an a “realistic style.” Most fans can’t really decide which figure to leave on the figure, as the decision comes down to which one they disliked less. I’m afraid I’m in this predicament as well, though there are features I like of each. I find myself preferring the hair of the realistic head and the face of the Anime head. Of the two, however, I think I’m more inclined to keep the realistic head.

IMG_1761 Realistic style IMG_1763 Anime style

I have, however, come up with a perfect solution. Don’t use the included heads at all. I present Shrunken Head Saber!

IMG_1766 Figma head, 1/8 scale body!

Somehow, that doesn’t look quite right. I guess I’ll stick with the realistic head after all… But enough text, time to close out with some more photos.

IMG_1724 Saber surveys the snowy landscape

IMG_1736 What are you looking at?

IMG_1757Sword close up

Figures in the snow

Charlotte saw one of its first major snowfalls of the year last night. The storm went on through most of the evening and left behind several inches of snow. Most of the city was shut down during the day, but since I’m originally from Upstate New York, this really felt more like an early spring day. Which means I didn’t mind going out, driving to work, etc. It also meant I had a golden opportunity to do some awesome figure photography. I present to you several series of snowy photos.

IMG_1644T: What’s all this stuff?

IMG_1647T: It’s kinda cold out here…

IMG_1649T: Aren’t you cold Shana? Neither of us are really dressed for this…

IMG_1650S: Nah, my leggings are pretty warm. Plus my hair is on fire.
 

The next day, Tsuruya-san came with me to the office. I spotted the following scene and decided it would make a great picture.

IMG_1664There’s irony in here somewhere, I just don’t know where it is

Once I got home, a couple of the girls decided to go out for a little beach party. Kokoro went out to scout the area first, then everyone else followed.

IMG_1691Shana, are you making a snow-mellonpan?

While the bikini girls were having a chillingly good time, Tsuruyu-san and Shana were at it again. This time it looks like Tsuruyu-san is having a bit too much fun…

IMG_1693 S: Tsuruya-san, what are you doing? You’re going to catch cold! IMG_1697 T: This is great! You really should try it, Shana!
 

IMG_1696

S: That’s probably not such a great idea… It might put out my hair.

It was a short windows of opportunity, but I’m glad I took advantage. If only I’d gotten the Gift Saber in today… That would have made for an awesome photo shoot!

Figure review – Kotobukiya Belldandy

After setting up my new lighting table, I decided to give it a workout by taking some nicer shots of the Belldandy figure I picked up at Katsucon. Compared to the initial photos I took of her, the new ones came out much nicer. The new lighting has smoothed out some of the shadows and gave an overall warmer color to the figure.

IMG_1281  IMG_1486
Old vs. New

With that out of the way, on to the review. This figure started life as a resin cast kit released by Kotobukiya back in 2001. From the look and style, she appears to be roughly styled after the movie rendition of Belldandy. Six years later, a preassembled and painted figure was released. Quality and detail is very high (as expected of any Kotobukiya figure), however there are a couple of visible flaws.

IMG_1512Close up showing off the facial features and jewelry

IMG_1496Another angle with the earrings and necklace

IMG_1498Low angle shot showing details below the dress, particularly like the rings and bracelets

IMG_1508 IMG_1507

Visible seams in the gloves and flaws in the hair

Despite the little flaws, overall quality on the figure is excellent. I’ve spent a lot of time looking for a good and well priced Belldandy figure for my collection so I’m really happy to have picked this one up. Now it’s just a shame a real one won’t come out of my mirror to grant me a wish… ^.^

Additional photos (pre and post lighting changes) can be found here.

New lighting setup

I picked up a couple of interesting photography tips today from comments over at DannyChoo.com about various ways to do lighting for figure photography. I’d recommend checking out this tutorial for some hints on constructing a cheap lighting setup.

Good photography is good lighting. A lot of people think that good lighting is expensive. Wrong. The best light source for photography is free. The sun! If you’ve got a backyard use it. Shoot in the morning or an hour or two before the sun sets for the prettiest light. Those looking for the quickest and easiest way to take pics of your figs, well there you go. But if you’re in the city or in an apartment and feel a little too funny about taking a half naked anime babe outside for a photo shoot while people walk by wondering what kind of freak totes a half naked anime babe out in public, this means you’re shooting inside.

It takes a little setup, but really all you need for an indoor lighting setup are two desklamps, a couple of big sheets of construction paper in different colors, a cardboard box, some tracing paper, and some tape. Many of you have tried the desklamp thing and gotten results you weren’t that happy with, but if you use them right, you can get some good results. The best type of easy indoor lighting is a daylight balanced (aka, full spectrum) light source, because it’s close to daylight in color and it burns relatively cool, which is a plus when shooting PVC. You can use normal lights, but just watch for overheating your figures and calibrate your camera’s white balance settings accordingly.

With that in mind, I hit the local Target for supplies. I picked up some tissue paper from the gift wrap section, some tape, a $10 desk lamp, a large white piece of craft board, and two 6500k fluorescent bulbs (one 60w equiv, the other 100w equiv). I’d also picked up some thumb tacks so I could finally hang up the flat sheet I was using as the table cover to make a uniform background. Once I all the stuff home, I found a medium sized box and set to work. The setup itself was fairly easy. Taking a couple sheets of tissue paper, I taped it to the ends of the box to create a diffuser.

IMG_1517 The end setup (opened up a bit to see properly)

I’m pretty happy with the results. The only tweak I’ll have to make is with the bulb size, as the 100w bulb I used for the main lamp is a bit too bright for such close proximity. I’ll need to step it down to a 60w and also take the overhead lamp down to 40w. I should also cut the craft board in half for a smaller reflecting surface to make it easier to manage and shoot around. In total, everything cost me under $30, with the bulk of the cost being for the desk lamp and the bulbs.