A week after I ordered the netbook, the RAM upgrade I purchased arrived. After a quick bout with a screwdriver, I removed the bottom panel and installed the new module. Here’s the result:
Although Win7 shows 2.50GB of memory available, the chipset is limited to using a maximum of 2GB. Despite this, the upgrade from 512MB to 2GB is pretty striking. Freya is far more responsive than before and applications are less prone to stuttering. As a testament, the Windows Experience Index for memory jumped from 2.9 to 4.4!
In addition to today’s upgrade, I found a couple of driver enhancements that could potentially improve battery life and functionality. The first major change was a BIOS upgrade that was issued by Lenovo a couple of days ago. The most noticeable change was alterations to the fan speed controller. Previously, the fan was either on or off, depending on the CPU utilization. The new update adds a more granular fan control scheme, reducing the amount of noise generated as the fan spins up. It also keeps power drain to a minimal since the fan won’t run at full power when not needed.
In addition to the upgrade, I finally found a compatible power management driver for Windows 7. It seems that the S10 is a mismash of hardware from other Lenovo machines, so it’s all a matter of finding the right driver for a different model. Fortunately for me, Windows 7 eventually identified the power management system as the same system used on one of the Y series laptops. It even gave me a link to Lenovo’s site for downloading the driver. Once installed, I’ve noticed some improvements in the battery life. Currently, the battery gauge is reading just over 50% and 2 hours of power remaining. Pretty good for such a minor tweak!
Meet Freya, the latest addition to my home computer network. She’s a Lenovo IdeaPad S10 netbook, featuring a 10in screen, 1.6Ghz Intel Atom processor, 512MB RAM (stock) and 80GB hard drive. I’d been considering getting something small and light for on-the-couch use as well as for travel, and this seemed like the perfect form factor for the job. Since Lenovo offers a discount for Microsoft employees, I decided to take advantage.
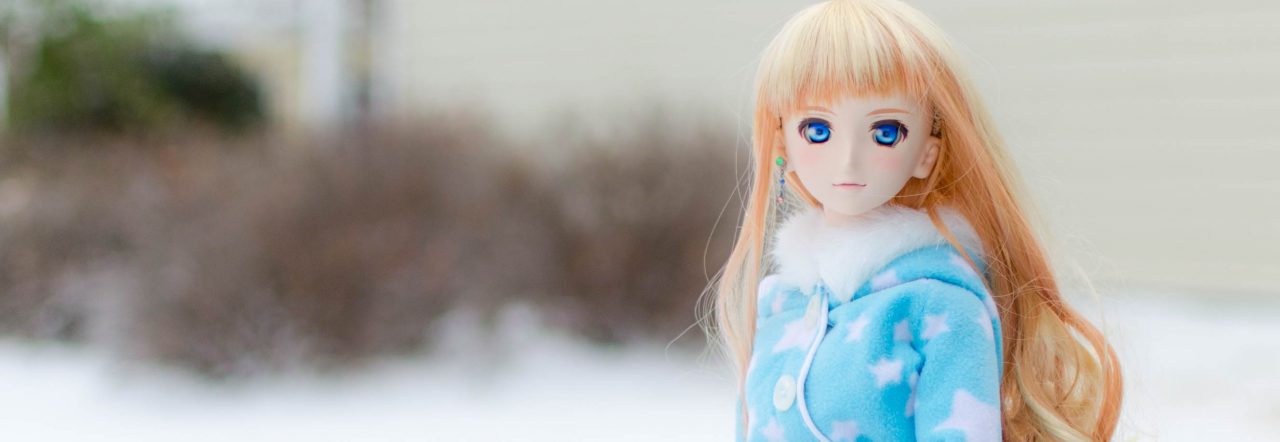
Tsuruya-san seems interested in the new toy
After a couple of hours of setup, I got Windows 7 and my required apps installed. Since I’ll be using this as a lightweight machine, I decided to go with a relatively lightweight application suite. The basic Office install is probably the most heavyweight program I put on. Other apps include:
Windows Live Suite (Messenger, Photo Gallery, Writer, Mail)
Firefox
K-Lite Codec Pack
Paint.net
Virtual Clone Drive
7zip
In all, I am very impressed with the performance given the size and specs. Windows 7 runs passably on half a gig of RAM and I even consider it usable. That, however, won’t stop me from upgrading to 2 gigs. The extra RAM should be here within the next few days, as it was placed on the same day as the machine itself. From what I’ve see, I don’t doubt that Win7 will become the OS of choice for low powered netbooks, easily replacing Linux as the users’ choice.
The form factor has presented a couple of challenges, however. the smaller keyboard is taking some effort to get used to. The lack of a full sized right shift key has caused me several problems, including constant mistypes of the “up” key. Also, the thinner keys means I’m not used to the shorter distance I would have to go to read the apostrophe key. I’ve been finding myself hitting enter by accident and having to correct for typos.
Battery life has also proved, as I’m currently on track to hit the 3 hour target for the 3-cell battery. At some point in the future, I may switch to a 6-cell, though I don’t foresee my usage habits to really dictate a strong need for one. At ~$50 for one, it’s a pretty pricy investment considering that I currently have $350 invested in the machine and upgrades so far.
Lastly, I decided to give Freya a fresh wallpaper today. After doing some searching, I found a half decent wallpaper with a “dark Chii.” Using Paint.net (not on the netbook, of course) I cropped around her image and cleaned up the edges. I then superimposed her onto an existing Windows 7 wallpaper I’d been using on other machines and altered the subtext. I’m pretty happy with the results. While Paint.net is a great editor and has a lot of features, it isn’t by any means a replacement for Photoshop. The magnetic lasso tool alone would have saved me a good chunk of time trying to select the outline. I guess I can’t complain, Paint.net is free while Photoshop is a several hundred dollar program… Anyways, here is the result of tonight’s work:
Windows 7: Freya edition
***this post was written entirely on the netbook***
After setting up my new lighting table, I decided to give it a workout by taking some nicer shots of the Belldandy figure I picked up at Katsucon. Compared to the initial photos I took of her, the new ones came out much nicer. The new lighting has smoothed out some of the shadows and gave an overall warmer color to the figure.
Old vs. New
With that out of the way, on to the review. This figure started life as a resin cast kit released by Kotobukiya back in 2001. From the look and style, she appears to be roughly styled after the movie rendition of Belldandy. Six years later, a preassembled and painted figure was released. Quality and detail is very high (as expected of any Kotobukiya figure), however there are a couple of visible flaws.
Close up showing off the facial features and jewelry
Another angle with the earrings and necklace
Low angle shot showing details below the dress, particularly like the rings and bracelets
Visible seams in the gloves and flaws in the hair
Despite the little flaws, overall quality on the figure is excellent. I’ve spent a lot of time looking for a good and well priced Belldandy figure for my collection so I’m really happy to have picked this one up. Now it’s just a shame a real one won’t come out of my mirror to grant me a wish… ^.^
Additional photos (pre and post lighting changes) can be found here.
I picked up a couple of interesting photography tips today from comments over at DannyChoo.com about various ways to do lighting for figure photography. I’d recommend checking out this tutorial for some hints on constructing a cheap lighting setup.
Good photography is good lighting. A lot of people think that good lighting is expensive. Wrong. The best light source for photography is free. The sun! If you’ve got a backyard use it. Shoot in the morning or an hour or two before the sun sets for the prettiest light. Those looking for the quickest and easiest way to take pics of your figs, well there you go. But if you’re in the city or in an apartment and feel a little too funny about taking a half naked anime babe outside for a photo shoot while people walk by wondering what kind of freak totes a half naked anime babe out in public, this means you’re shooting inside.
It takes a little setup, but really all you need for an indoor lighting setup are two desklamps, a couple of big sheets of construction paper in different colors, a cardboard box, some tracing paper, and some tape. Many of you have tried the desklamp thing and gotten results you weren’t that happy with, but if you use them right, you can get some good results. The best type of easy indoor lighting is a daylight balanced (aka, full spectrum) light source, because it’s close to daylight in color and it burns relatively cool, which is a plus when shooting PVC. You can use normal lights, but just watch for overheating your figures and calibrate your camera’s white balance settings accordingly.
With that in mind, I hit the local Target for supplies. I picked up some tissue paper from the gift wrap section, some tape, a $10 desk lamp, a large white piece of craft board, and two 6500k fluorescent bulbs (one 60w equiv, the other 100w equiv). I’d also picked up some thumb tacks so I could finally hang up the flat sheet I was using as the table cover to make a uniform background. Once I all the stuff home, I found a medium sized box and set to work. The setup itself was fairly easy. Taking a couple sheets of tissue paper, I taped it to the ends of the box to create a diffuser.
The end setup (opened up a bit to see properly)
I’m pretty happy with the results. The only tweak I’ll have to make is with the bulb size, as the 100w bulb I used for the main lamp is a bit too bright for such close proximity. I’ll need to step it down to a 60w and also take the overhead lamp down to 40w. I should also cut the craft board in half for a smaller reflecting surface to make it easier to manage and shoot around. In total, everything cost me under $30, with the bulk of the cost being for the desk lamp and the bulbs.
For those who have been following my photo album uploads, you probably noticed that I’d been uploading albums of figures that I’d gotten at Katsucon. Since I finally got to doing photo shoots of the rest of the figures, I decided to put together a short summary of the things I’d picked up.
First up are the first Figmas in my collection (from left to right: Shana, Saber, and Tsuruya). The first time I saw a write up about them on DannyChoo.com, I didn’t really understand them. Posable figures seemed a bit odd to me, and the ball joints made them look kinda odd. However, when I saw the Kagami Figma from Lucky Star, I figured I’d get one to see what it was all about. That and I wanted my own to take to random places for pictures. It didn’t take me long to find my first purchases, Saber and Tsuruya-san. Once I got them back to the hotel and cracked open the boxes, I was instantly hooked. They weren’t cheap or flimsy as I’d originally expected, but rather well put together. The bendable “cloth” bits were actually made of a soft pliable plastic and all the parts are very solid. Each one comes with different faces for various expressions, hands for different poses, a stand, accessories, and a small ziplock bag to store the extra pieces in.
Unboxed figmas and accessories
I was so impressed that I went back to get the Shana Figma I saw earlier in the day. I think she and Saber will be having sword fights.
En garde!
In addition to the Figmas, I’d found several other gems that I decided to bring home.
Click on each image for full album
From upper left to lower right: Sakura Matou from Alter, Belldandy from Kotobukiya, Tohsaka Rin from Kotobukiya, Ropponmatsu from Yamato, and Kasumi from Kotobukiya. I’ll probably do more in depth reviews later for each figure, so I won’t bother to do anything in depth here.
Although I managed not to get anything that was on my buy list, I still managed to spend a lot of money. I did, however, come close to buying the Gift Saber that was on my list. I saw her at one of the sellers booth but hesitated on price (she was marked at $140). Since I thought the tag was a bit high, I decided to come back later. By the time I came back, she was gone – I’d apparently missed her by a couple of minutes. Even though I knew the price was too high, I was a bit disappointed that I didn’t have the opportunity to make the decision on my own. So I did the next best thing. As soon as I got home, I put in the order to HLJ to have it shipped to me. In total, the figure cost me 8609 Yen, which is around $92. In the end, someone saved me $48 by buying her before I got the chance to! ^.^
After the wonderful lesson in waiting in line during the first day, we got a chance to put our skills to practice. We got an early start and had a nutritious (and expensive) breakfast at the hotel then hit the convention floor. Since the panels were a bit lackluster this year, we made a beeline to the merchants room only to find this:
Yep. That’s a line to get into the merchants room. It hadn’t opened for the morning yet, and people were waiting. Eventually, the staff did the same thing as for registration and herded us into the parking garage. Fun times. There are some advantages to waiting though. Since we were at the escalator, we saw some interesting sights.
People waiting in line upstairs for registration
OMG Moogle!
Once in, we spent the next several hours browsing, buying, browsing some more, and buying even more. At some point, we decided enough was enough and had to break for lunch. Despite having a decent buy list, I ended up not getting anything on the list. Somehow, that didn’t stop me from spending a bunch of money. I did, however, come really close to getting the Gift Saber. I saw her sitting in the corner of a booth and had even picked her up to examine her. The detail was stunning and she carried a price tag to match. Since I knew that particular seller had a tendency to overprice (I’d bought from them in the past), I put her back to go back to my rounds. Because she was fairly expensive, I figured she’d still be there when I got back. Boy was I wrong. On my return trip, I learned that she had just been bought not moments before I arrived. I really didn’t need to spend that $140 anyway. Luckily for me, I should be able to pick her up from HLJ for a bit less than the going con rate… One thing is for certain though, I know that’s a figure I want!
After meeting up with an old college buddy, we headed out for some food and conversation. Since we’d relegated ourselves to McDonalds the past two days, we went in search of a place that didn’t have a dollar menu. I may be an otaku at a convention, but I’m an otaku with a steady income. I had to find something that wasn’t the equivalent to instant ramen!
Then it was back to the dealer room to spend more money. I didn’t do as badly in the afternoon, acquiring a pair of figures. Since there really wasn’t much else going on, we dropped our stuff at the hotel and checked out the tail end of the AMV screenings. Of course, the only thing we really wanted to see was the absolutely awesome “Dragonball Z: The Silent Movie” video. If it didn’t win best of show and every other award, I’d have to stop going to Katsucon all together.
Of course, this put us in the perfect position for viewing Masquerade, as the video room was also serving as a simulcast for the actual event. Unfortunately, there were some technical difficulties with sound not always coming through or video being stuck on the Katsucon logo. In all, the viewing experience was subpar and a bit poor considering this has been going on for 15 years. Similarly, the skits that were put on were a bit lackluster compared to previous years. None of them really motivated the entire crowd or drove me to find a recording on YouTube. It was a shame, really.
The evening wore on and we ended up at the “Guest Uncensored” panel, which was marked 18+ and featured an ID check at the door. That alone made it awesome, because all the kiddies and fangirls weren’t allowed in. 🙂 It featured several of the guests from the con answering ridiculous questions, swearing, making rude jokes, and snorting Pixy Stix. All under the guise of a Q&A session. Truly classic. And there was Evangelion bashing. WHAT WERE THEY THINKING?!?!?! THE ENDING WAS HORRID AND THE BIGGEST DISSAPOINTMENT EVARRRR!!!
The final day was more of the same, with a rounds through the merchant room and random picture taking. Pretty low key right before getting in the car and driving back.
The trunk of my car, in all its glory
The convention itself was enjoyable. however, as an otaku get together, I felt it lacked a certain flair and excitement. The amount of panels felt scaled back (4 panels running at once), the events didn’t have the same “pop” as the past, and even the merchant room lacked a certain something (namely Sasuga Books). Compared to previous years, it also seemed less well organized (4 hour long registration line for pre-regs) and smaller (venue was a bit cramped). Also, with the lack of any seriously interesting guests, it became more of a shopping trip rather than a chance to see and meet some of the industry’s personalities.
With the final day approaching, I think it’s time to summarize my experience at Katsucon 2009. We arrived in DC at around 4pm, after the 7 hour drive from Charlotte. Once we got checked in to the hotel, we made our way to the registration line, only to discover that it had snaked around the hotel, through the lobby, out the door, and down the street. Apparently, there was some “logistical issues” that prevented registration from moving smoothly. It also turns out that those that were buying their passes at the door were granted easy access. Oops. Given that there wasn’t much of a choice in the matter, we stood at the end of the line. While it wasn’t the typical DC February weather, it was far from a tropical day. The presence of sun made it bearable, but the approaching nightfall did not bode well for those of us still standing outside.
It was a bit chilly outside, and I’d left my jacket in the room
Fortunately for us, convention organizers recognized this as an issue and herded us into the underground parking garage. For better or for worse, this became our home for the next several hours. Small groups would be taken in to the registration area for processing but progress was extremely slow. We didn’t reach the pre-staging area until around 6pm. Almost an hour later, we had our badges in hand and were ready to go.
Lined up like sheep
Our first order of business was to find something to eat. It had gotten late and we were hungry. We checked out the maid cafe, but discovered reservations were required for entry. We were told there was a McDonalds across the street, so we headed out to find it. What we weren’t told was that this “street” was actually a relatively busy 4 lane divided highway. Watching con-goers scurry across and jump the divider was amusing, especially if they were in costume. This provided further amusement once we had sat down to eat. “Hey, isn’t that Rinoa running across the street?”
Since we had gotten such a late start, there wasn’t much left to do besides go to the AMV screening. Most of the videos were fairly blah, but there’s always the one that is the clear leader. This year, it was an interesting pairing of Dragonball and the Sailor Moon piano arrangement. The video was titled “Dragonball: the silent film” and featured every single possible cliché from Dragonball Z. This video is so full of awesome, I’d recommend watching it. It’s available on YouTube.
The AMVs pretty much ended our first day at Katsucon. Before we turned in for the night, we spied a group of girls in some great costumes. I’ll let the picture speak for itself.
A group of girls cosplaying as the FREEing Haruhi bunnies
With Katsucon just days away, I’m starting the process of gathering my gear together for the trip. In addition to the necessities like clothes and toiletries, I had to put together a selection of items to make sure I’m well armed for the con. In the picture above, I’ve got a few necessities, including my DS, compact digital camera, extra batteries for camera, spare memory card and a bag to put it haul it around in. Also, to blend in with the locals, a set of nekomimi will be required. I’m sure I’ll pick up a couple other items in the next day, and I’ll need to prep my laptop for the trip. I’ll also be bringing the SX10 along with me and had to make sure it’ll fit in the bag.
I’ve also made a list of things to look for in the dealer room:
Toysworks 1/6 ARIA figures – Still missing Aika, Alice, and Athena… doubt I’ll find them
Max Factory 1/8 Narusegawa Naru… also doubt I’ll find this one
Gift 1/8 Saber (relatively new release)
Griffon 1/7 Shana
FREEing 1/4 Ryoko Asakura bunny
Some sort of Figma… probably the Hiiragi Kagami one, just a really big fan of the look
Wave 1/10 Rena Sayers (Mai-Otome S.ifr)
Aqua Volume 1
Beyond that, I’ll be a bit discretionary with my funds. I don’t want to overdo it, in the case something catches my eye as a “must have.”
Special thanks given to ravnel at DannyChoo.com for giving me the opportunity to own this figure.
I got out of work a little early today so I could enjoy the sunshine. When I got home, I found a nice surprise in my mailbox. The Kokoro figure that I’d bought from another user on DannyChoo had arrived! Each unboxing is a special event, and this was no different. Since she was still new and unopened, she still had that new figure smell.
Kokoro in the box
Once I’d removed her, it was time to take some photos. She comes with several options, so there was room for experimenting! At first, I had her positioned in front of a window to get the natural light effects.
The cast off pieces are pretty easy to remove. She comes with extra ribbons to complete the swimsuit look, as well as a strap for the top. Additionally, she comes with an umbrella and a base. All of the parts are extremely detailed and very well made.
Then I realized there was a far better place in the room… the wall opposite of the window. In order to get the best light, I had to act fast, as the sun was setting.
Pictures came out a bit yellow, but adjusting the white balance gave a much better look
For more photos, click through to the album. She even had a special guest join her for this occasion!
Today I decided to pull out the nicest (and hardest to find) set of figures in my collection to date. Meet Akira Ferrari, Alicia Florence, and Akari Mizunashi from ARIA. Toysworks had done a 1/6 scale series of figures coinciding with the release of ARIA -The Natural- and in total feature all 6 of the main undines. I’m very impressed with the quality on these figures and they’re the only ones that come preassembled to the base and are actually mounted with screws:
Two screws hold the feet down
I was lucky enough to find Alicia and Akira up on eBay while Akari came from a dealer at Animazement two years ago.


 The trunk of my car, in all its glory
 It was a bit chilly outside, and I’d left my jacket in the room


You must be logged in to post a comment.